
A part name is an index, not an identification
A power tiller part is identified by five things: the platform and configuration it came off, the system it belongs to, the markings on the part itself, the dimensions you measure, and photographs that show both the whole part and where it sits. A part name is only an index to those five — and most of the delay in a parts enquiry comes from sending the index and expecting an answer.
One disclosure first, because it decides how you read what follows: this article is published by SUNTEC, which builds the M80 and GN12 platforms used below as examples. We sell one side of this transaction, so every step is written to be run against us. Spare parts and technical support is how that side of the business is organised.
Start with the machine's own name, because it is not stable. The FAO training manual on farm machinery operation and repair opens its two-wheel tractor session with a list of aliases:
"Two-wheel tractors (2WT) are also called 'hand tractors', 'walking tractors' and even 'power tillers' as they are often sold together with a rototiller implement."
That sentence comes from the FAO training manual on the operation, maintenance and repair of farm machinery (FAO, 2022), and it is the first reason a one-line parts request fails: your customer calls it a hand tractor, your workshop calls it a walking tractor, and the factory files it as a power tiller. Nothing is wrong with any of the four names. They simply do not sort the same way on the other desk.
The instability runs one level down, where it costs real time. Rotavator, rotary tiller, rotary hoe and cultivator all describe machines that cut soil with blades on a horizontal shaft, and the blades are called tines, blades or C-shaped blades depending on which catalogue you hold. Manuals do not settle it either. One figure in the FAO manual describes a tractor-mounted rotavator as a central hitch tower with a lateral hitch point and C-shaped blades; another describes a power tiller's rototiller as a transmission gearbox with a clutch, a depth-regulating lever and curved blades. Two attachments doing one job, described in two vocabularies.
So send the name — but as a label on a package, not as the package.
Start from the platform and the system, not the part
"Which machine?" is asked first for a mechanical reason, not a bureaucratic one. On a two-wheel tractor the parts belong to the machine's own assembly, and the assembly changes between platforms and between configurations of one platform.
SUNTEC's current range is two platforms, both listed on the power tiller product pages. The M80 is a lighter chassis documented at 2050 × 710 × 1235 mm, 179 kg without the engine, 7–10 hp compatible engines, six forward and two reverse gears, and a 480 mm standard or 600 mm optional tilling width — 14 blades standard, 16 in the wider arrangement, with wheel tread from 390 to 780 mm. The GN12 walking tractor is the heavier platform: 2950 × 980 × 1240 mm, 470 kg without the engine, a 12.5 hp class engine reference, six forward and two reverse, wheel tread from 570 to 810 mm, and a customer-confirmed public tilling width of 480 or 600 mm — the customer's own specification sheet records the 600 mm configuration with 18 or 24 blades.
Two consequences follow. First, 480 mm and 600 mm are not two settings of one machine: different blade counts, different rotor arrangements, different parts. Second, the engine is a separate supply item from the chassis. The specification sheet on file records an RT90DI engine reference for the 7–10 hp range at 487 cc, 9 hp maximum and 8 hp continuous output, with hand-crank or electric starting shown as options; which engine and which starting method is finally supplied is confirmed per quotation. An engine part and a chassis part are answered by two different records, and a request that does not say which side it belongs to will be asked to start again.
Then place the part in a system. The machine's own drive path is the map: on the M80 the engine reaches the main shaft through two V-belts, the main shaft reaches the wheel axle through gears, and the transmission reaches the blade axle through a chain. That one sentence tells you a belt question is an engine-side question, a chain question is a tiller-side question, and a gear question is somewhere in between — before anyone has said the word "gear" out loud.
System | What lives in it | What you must be able to state |
|---|---|---|
Engine and fuel supply | Engine, starting arrangement, fuel tank and lines, filters, carburettor or injection components | The engine reference as marked, and the starting method |
Clutch and main drive | Main clutch, pulleys, V-belts, belt guards, main shaft | Belt section and count, pulley position |
Transmission and final drive | Gearbox, gears, bearings, oil seals, wheel axle | Housing position, and where inside it the gear or bearing sits |
Rotary tiller drive | Blade axle, chain case, chain, sprockets, blades and blade bolts | Which width arrangement — 480 or 600 mm — and the blade count |
Controls and wheel/hitch hardware | Selector and levers, cables and end fittings, wheel hubs, hitch frame, pins and bushes | Selector or lever position, tread setting, mounting side |
The hitch shows why the system question is not pedantry. The FAO manual describes the hitch point on most two-wheel tractors as a sliding-pin mechanism at the back of the engine mounting frame, below the handlebar support — and then adds that, depending on model and brand, this "can differ slightly". On the same page it notes that some models let the user remove the hitch point to reach the transmission gearbox directly and use it as a power take-off. A pin described only as "the pin at the back" could belong to any of those arrangements.
That boundary is not unique to one manufacturer. A university extension guide for small vegetable farms states it without hedging: "each Walk Behind tractor has its own universe of implements. You cannot connect implements meant for a different Walk Behind tractor, or a traditional tractor." The sentence, from extension guidance on walk-behind tractors, is about implements, but the same boundary runs through the parts that carry and drive them: the assembly decides what fits, not the product category.

The same platform with the parts still on it: belt guard, transmission housing and its mounting bracket, wheel and axle, tiller cover. Start the request here — "the bracket on this housing, on the implement side" — and the part has an address.
Four things that identify a part on the bench
With the platform and the system settled, the part itself has to give four pieces of evidence. Suppliers work from these, in this order.
1. Installed position and function. Not where it was bought — where it worked. "It sits between the pulley and the main shaft and it takes the drive from the engine" identifies a belt far faster than any photograph of a belt. If the part has failed, describe what the machine did when it failed: the symptom narrows the system, the position narrows the part.
2. Markings on the part itself. Castings carry numbers, letters and foundry marks; gears carry tooth counts cast or stamped into the face; bearings and seals carry size codes; belts carry a section and a length code. Those marks are the closest thing to a part number you will get without the original file. The FAO manual makes the point in the most ordinary way possible: when replacing a broken or lost belt, it says, look for the belt number to find a matching spare part. On a housing it is often only a raised figure that means something inside the factory's own record — which is why the photograph matters as much as the transcription.
3. Measured dimensions. Numbers travel better than descriptions and survive a language gap. What to measure depends on the part type; the next section gives it by category.
4. The mating part. What does it press into, bolt onto, drive or sit against? A bearing is only identified once you say which shaft it rides and which housing holds it; a pin is only identified once you name the bush it turns in. This is the question buyers skip most often, and it is the one that turns a plausible match into a confirmed one.
Where an illustrated drawing exists, the reference number on it beats all four. Training documents are organised exactly this way, in named and numbered sections — a two-wheel tractor training manual published on CGIAR's CGSpace repository is one of several operator-level documents that do it. If your machine arrived with a parts book, the figure number and item number are the shortest description you can send; if it did not, the four pieces of evidence above are the substitute. Reading the numbers you do have is its own skill, covered in how to read a power tiller specification sheet.

The complete part, not the fragment: a steel traction wheel is a hub flange, welded spokes and rim lugs. "A broken lug off my wheel" names one item on one of these two assemblies — which is why the whole item goes in the photograph.
What to photograph, and what each photo has to show
Photographs are the fastest evidence to produce and the easiest to get wrong. Four images, in this order, cover almost every parts question.
- A wider view of the installed location. Stand back far enough that the viewer can see where on the machine the part works — include the wheel, the tiller housing or the handlebar support in frame. This is the photo people forget, and it answers "which of the four similar items do you mean".
- The complete part, front and back. Whole item in frame, on a clean surface, in daylight. If it is long, photograph it in two overlapping halves rather than cropping one end.
- Every marking. Close enough to read. If the marking sits on a curved surface, take two photos from different angles rather than one blurred one.
- A size reference. Lay a tape or a rule alongside the dimension you care about, or put a caliper across it, and keep the measuring tool in frame. A photo with a visible tape is a measurement; a photo without one is an impression.
Four failure modes account for most unusable sets. A close-up of the broken fragment alone — the fragment is the least identifying part of the whole item. A part photographed where it fell, half hidden against soil, so the outline cannot be read. A screenshot of a chat message instead of the original file, which strips the detail the supplier needs. And one photo carrying all four jobs at once, which does none of them. Send original files, name each one for what it shows, and if the part is still installed, photograph it before disassembly.
One safety rule belongs at the front of the list, because some of this work happens with your hands inside the machine: shut the machine down and cut the drive before touching, adjusting or clearing the mounting and drive area, and take photographs with the engine stopped. Penn State Extension's summary of agricultural safety and machinery regulation is explicit that power is to be shut off before working on a machine and that drive and nip points stay guarded.

What part-level evidence looks like: housing orientation, the pulley and its guard, both shaft ends, the mounting faces. A photograph like this plus a tooth count usually opens a parts file.
What to measure, by part type
Measure with the scale you have — a tape for length and outside diameter, calipers for bore and thickness, a thread gauge where threads are involved — and record the numbers with their units. Then match the part type to the measurement that decides the identity.
Part type | Measure | Why it decides the match |
|---|---|---|
Gear | Tooth count, outside diameter, bore, keyway or spline profile, face width | Tooth count and bore separate visually identical gears; the spline or keyway settles the shaft it fits |
Bearing, oil seal, gasket, O-ring | Bore, outside diameter, width or section, plus any visible size code | These are standard-form items bought by dimension; the marking and the dimension are interchangeable evidence |
Shaft | Overall length, both end profiles, spline or keyway, shoulder positions | Two shafts can look alike in the middle and differ at the ends, where the fit happens |
V-belt / drive belt | Section profile, inside length or the belt number, number of pulley grooves | The manual's own advice is to read the belt number; section and length are the fallback where the number is worn |
Blade or tine | Tilling width arrangement (480 or 600 mm), blade count, blade profile, mounting hole spacing | Blade sets differ between the two width arrangements; hole spacing decides whether a blade mounts at all |
Selector, lever or control cable | Both end fittings, route length, the position it operates from | Cable assemblies are identified by their ends, not by length alone |
Hitch and wheel hardware | Pin or bush diameter, mounting side, wheel tread setting, the part it mates with | Tread settings and mounting sides differ between configurations of one platform |
Two rules make the numbers usable. Measure the unworn end wherever there is one: a worn pin, a stretched cable and a flattened bush have all changed shape in service, so they are a guide to what you need rather than a dimension to quote. And record the measurement you took, not the one you expected — a gear quoted at 20 teeth because that is what the parts list says is worth far less than a gear photographed with 19 visible.
Where the part belongs to an implement rather than the machine itself — a plough, a trailer connection, anti-skid wheels — the same rules apply, but the system question comes first, because implement sets are matched to a platform rather than shared across it. On the GN12 that means naming the 480 mm or 600 mm tiller arrangement before naming the part, and on the M80 the same. Both platform pages are the reference for which configuration you are working from.

Why a shaft is measured end to end: these two differ at the ends and at the shoulders, which is where the fit happens, not in the middle where they look alike.

Three measurements and one reading: count the teeth, measure the outside diameter and the bore, and read the marks cast into the face. The splined bore tells you which shaft this gear turns on.
How to write the enquiry so it comes back complete
Everything above is preparation for one message. Write it in this order, and keep it in one place rather than spread across three emails and a chat thread.
- Platform and configuration. Model, engine reference and starting method, wheel tread setting, and the tilling width arrangement if a tiller part is involved.
- System and installed position. Which of the five systems, and where in it — "between the pulley and the main shaft" rather than "in the drive".
- Part description in your own words, plus the trade name your workshop uses, so the other side can map it to their own naming.
- Markings read off the part.
- Measurements, with units.
- Photographs — the four-image set, sent as original files.
- Quantity, destination and packing requirement, so the reply can cover what you actually need to order.
# | Confirm | Where the answer comes from |
|---|---|---|
1 | Platform and configuration | Your machine record |
2 | Engine reference and starting method | Engine identification and the quotation |
3 | Tilling width arrangement and blade count | The machine as built |
4 | System and installed position | The part as it was fitted |
5 | Markings read off the part | The part itself |
6 | Measured dimensions, with units | Your measurements |
7 | Complete-part photographs, front and back | Your photo set |
8 | Installed-location photograph | Your photo set |
9 | Mating part named | The assembly the part came out of |
10 | Quantity required | Your stock or order plan |
11 | Destination and packing request | Your order |
12 | What will be confirmed per quotation | The quotation itself |
What an answer that is not an answer looks like: "it fits" without naming the platform; "standard size" without a number; "same as the old one" without the old one's markings; a photograph of a different model's assembly; or a part number offered with no statement of which machine it was checked against. Any of these means the check has not happened yet, on one side or the other.
It also helps to know what the parts process can and cannot return. Part identification and supply are confirmed item by item against the machine you have, and price, availability, packing and commercial terms appear in the quotation rather than in a catalogue page. Sending the full record first is what lets the second message be a quotation instead of a question — the same discipline the purchasing side needs when it writes an initial enquiry, set out in the power tiller procurement guide. When the record is ready, send it and open the parts request rather than describing the part again in a separate message.

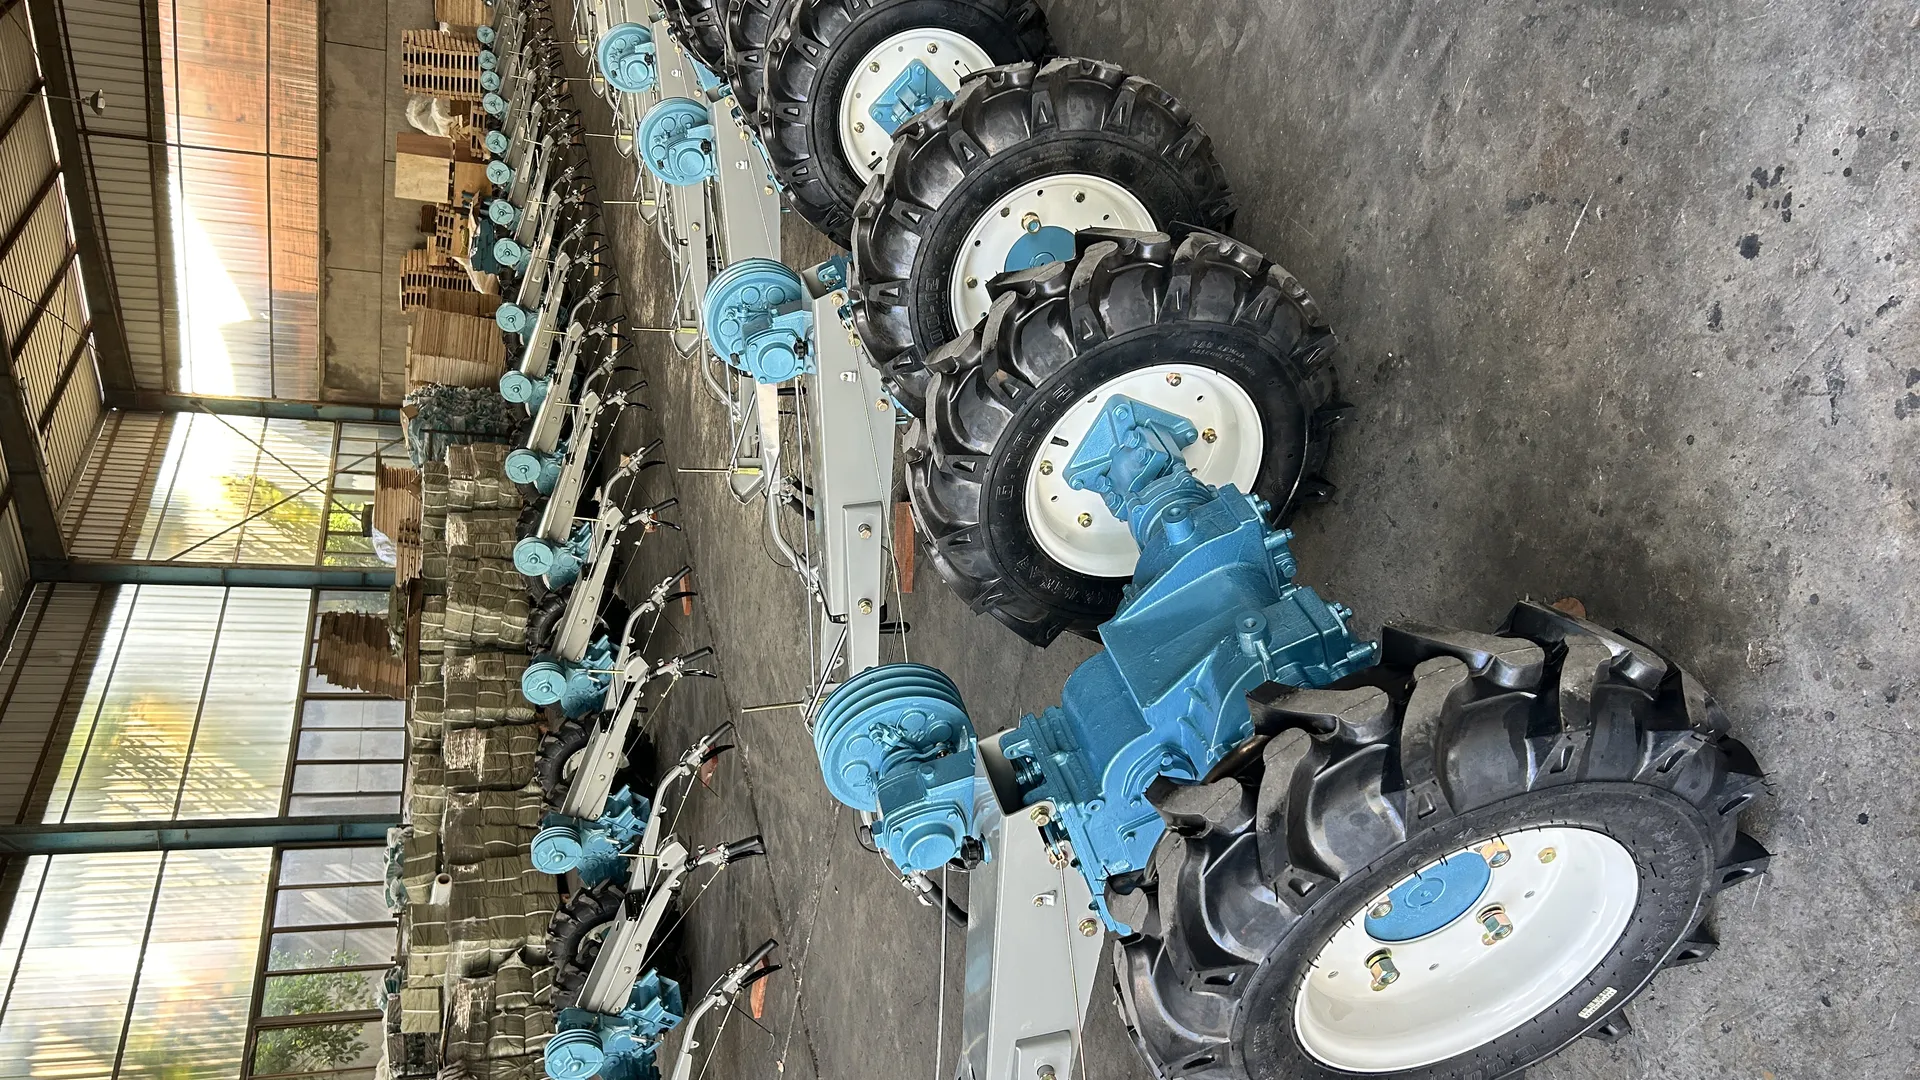
The other end of the message: assemblies waiting to be matched against an incoming parts request. The record you send decides whether the match happens on the first reply.
The three records that make the next order easier
The first parts order on a new machine is the expensive one, because everything has to be discovered. Three records turn the second order into a lookup.
The machine record. Platform, configuration, engine reference and starting method, wheel tread setting, tilling width arrangement — plus any serial or production identification on the machine and on the engine. Write it down once, keep it with the machine, and update it when a configuration changes. A machine that reached you in a mixed shipment, or as a used unit, may have no complete paperwork at all; recording the configuration yourself is the replacement, and it is what makes the engine-versus-chassis distinction answerable later.
The parts record. Whatever parts list, catalogue or illustrated drawing you hold, filed by system rather than in the order parts failed. Where a number was confirmed for you, record the number and the item it was confirmed for — a number is only useful with the machine it was checked against. Where there is no drawing at all, the evidence procedure behind a parts request is the same three steps the checklist above ends with: confirm the configuration, document the part and its installed position, then state the quantity, destination and packing you need.
The photo record. The same four-image set you sent, saved under the system name. Next season, "the belt on the engine side" will already have a photograph, a belt number and a measurement against it — and the request becomes a one-line message with an attachment.
An identification plate and its paperwork are not always present, and an incomplete record is normal on imported equipment. What is not recoverable is the state of the machine before you took it apart.
FAQ
What are the names of all the parts of a power tiller? There is no single universal list, which is why identification does not start with names. The workable groupings are the engine and fuel supply; the clutch and main drive; the transmission and final drive; the rotary tiller drive; and the controls, wheels and hitch hardware. Within those groups the items are standard-form components — belts, gears, bearings, oil seals, shafts, blades, cables, pins and bushes — identified by position and dimensions rather than by a name alone.
What are the main components of a power tiller? An engine on the frame; a main clutch and belt drive from the engine to the main shaft; a gearbox and final drive to the wheel axle; two wheels on a single axle with adjustable tread; handlebars carrying the clutch, gear and throttle controls; and a driven implement at the rear, usually a rotary tiller. On the M80 the engine-to-main-shaft drive is by two V-belts, the main shaft drive to the wheel axle is by gears, and the transmission drive to the blade axle is by a chain.
What are the common problems to look for on these machines? Belt slip and belt wear, blade and tine wear or breakage, chain wear and stretch in the tiller drive, oil seal leaks, control cable stretch and clutch wear. Treat a symptom as the first filter rather than the answer: it tells you which system to open, and identification starts from what you find inside.
Can a part from one machine be used on another? Do not assume it. The two current platforms differ in chassis, transmission and blade arrangement, and within one platform the 480 mm and 600 mm tilling arrangements use different blade counts. The engine is a separate supply item from the chassis, so the same chassis model can carry different engine references in different markets. Two machines with the same model name are not automatically the same parts machine.
How do I describe a part I cannot name? Give the five things in order: platform and configuration, system and installed position, markings on the part, measured dimensions, and photographs of the complete part and its installed location. A supplier with those five can name the part back to you, which is faster than guessing at a name and being corrected twice.
Where do I find the machine's identification? On the machine itself: the frame or housing for the machine designation, and the engine for the engine reference. Photograph both plates rather than transcribing them by hand — a transposed character creates the same failure as a missing plate. If neither is legible or present, send photographs of the complete machine and of the part's installed area, and state what you can measure.
Bottom line
Identification is a procedure, not a lookup. Fix the platform and its configuration, place the part in a system, read what is marked on it, measure what the part type requires, photograph the whole item and the place it worked — then write all of it into one message. Do that and the reply is a quotation for a named item instead of a question about which item you meant. Do it once more, file the record, and the next order stops being a project.