
Why "compatible" is not a question a catalogue can answer
A power tiller implement is not confirmed by a catalogue line, a "fits most models" claim or a price. On a walk-behind tractor, compatibility is decided by four things you check one at a time: the platform, the mounting and drive interface, the field dimensions you will work in, and the exact scope written into the order.
One disclosure before the checks, because it decides how you read them: this article is published by SUNTEC, which manufactures the M80 and GN12 platforms used below as worked examples. We sell one side of this transaction, so every check is written to work against us as well — the same questions go to any supplier, and the answers belong in writing. The implement range these platforms can carry, grouped by the work it does, is set out in the implements and attachments hub.
On a four-wheel tractor this question has a lookup. The rear three-point linkage is standardised: ISO 730 sets the hitch dimensions — pin diameters and lower-hitch-point span — for categories 1N to 4, so an implement built to Category 1 hangs on any Category 1 tractor and a genuine cross-brand chart is possible. That is the world most "implement compatibility" pages are written for.
A walk-behind tractor has no equivalent lookup. The implement attaches to the machine's own bracket arrangement and takes its drive from the machine's own transmission path, so each platform and its implements form a closed system. University extension guidance for small vegetable farms states it without hedging:
"…each Walk Behind tractor has its own universe of implements. You cannot connect implements meant for a different Walk Behind tractor, or a traditional tractor."
That sentence — from extension guidance on walk-behind tractors — is the whole reason this article exists, and it also rules out the shortcut most buyers try first: that another brand's implement, or a full-size tractor's rototiller, can simply be adapted on.
Dealer-level charts do exist — BCS America publishes one for its tractor models and implement lines — but read what they are: a model-by-implement matrix answering "which of our implements fit our tractors". That is the seller's question. Your question is what has to be true before you can commit to an order, and that is the four lines below.

The implement side of the interface: a rotary cultivator arrives as its own assembly — gearbox, drive cover, blade rotor and mounting bracket. That bracket and that drive input are what have to match your machine.
The four lines every compatibility check has to cover
Treat "is it compatible?" as four separate questions, because they fail separately and are answered by different people.
Line | The question it settles | Where the answer comes from |
|---|---|---|
| Which machine is this implement going on — model, and which configuration of it? | Supplier's platform documentation |
| How does the implement attach, and where does its drive come from? | Mounting photographs, drawings, parts list |
| Will it pass the access, cover the width you need and turn where you turn? | Your own measurements on site |
| Exactly what is in the crate, on which line of the quotation? | The quotation and packing list |
The interface line is the one buyers skip, and it decides whether the implement does anything when it lands. On the M80 platform the documented path runs engine to main shaft through two V-belts, main shaft to wheel axle through gears, and transmission to blade axle through a chain — the rotor is driven from the machine. On the GN12 the drive passes to an iron gearbox at the rotary connection. Either way the implement's driven input is built around that machine's transmission, not around an interchangeable shaft.


The mounting side of the interface: M80 hitch frame shown as a component reference. Brackets and connecting hardware like this sit on one side of an order or the other — they are not assumed to follow the implement.
A third pattern is worth recognising. Some mounted implements are designed to suit a power class rather than one model: agricultural university material on power-tiller-mounted implements documents one whose drive is taken from the engine pulley and whose frame bolts to the hitch bracket assembly at the rear. Such an implement can fit more than one machine — but only where the take-off and bracket points match. A power rating of 8–10 hp is a power statement, not an interface statement.


Both platforms used here illustrate the principle at different weights. The lighter M80 power tiller platform is documented at 179 kg without the engine, 7–10 hp compatible, 480 mm standard and 600 mm optional tilling width, 14 blades standard and up to 16. The heavier GN12 walking tractor is documented at 470 kg without the engine, 12.5 hp class, 480 mm or 600 mm tilling widths, and — in the customer specification sheet on file — a 600 mm configuration with 18 or 24 blades. Those are chassis figures: usable in an order only once the interface line is confirmed separately.

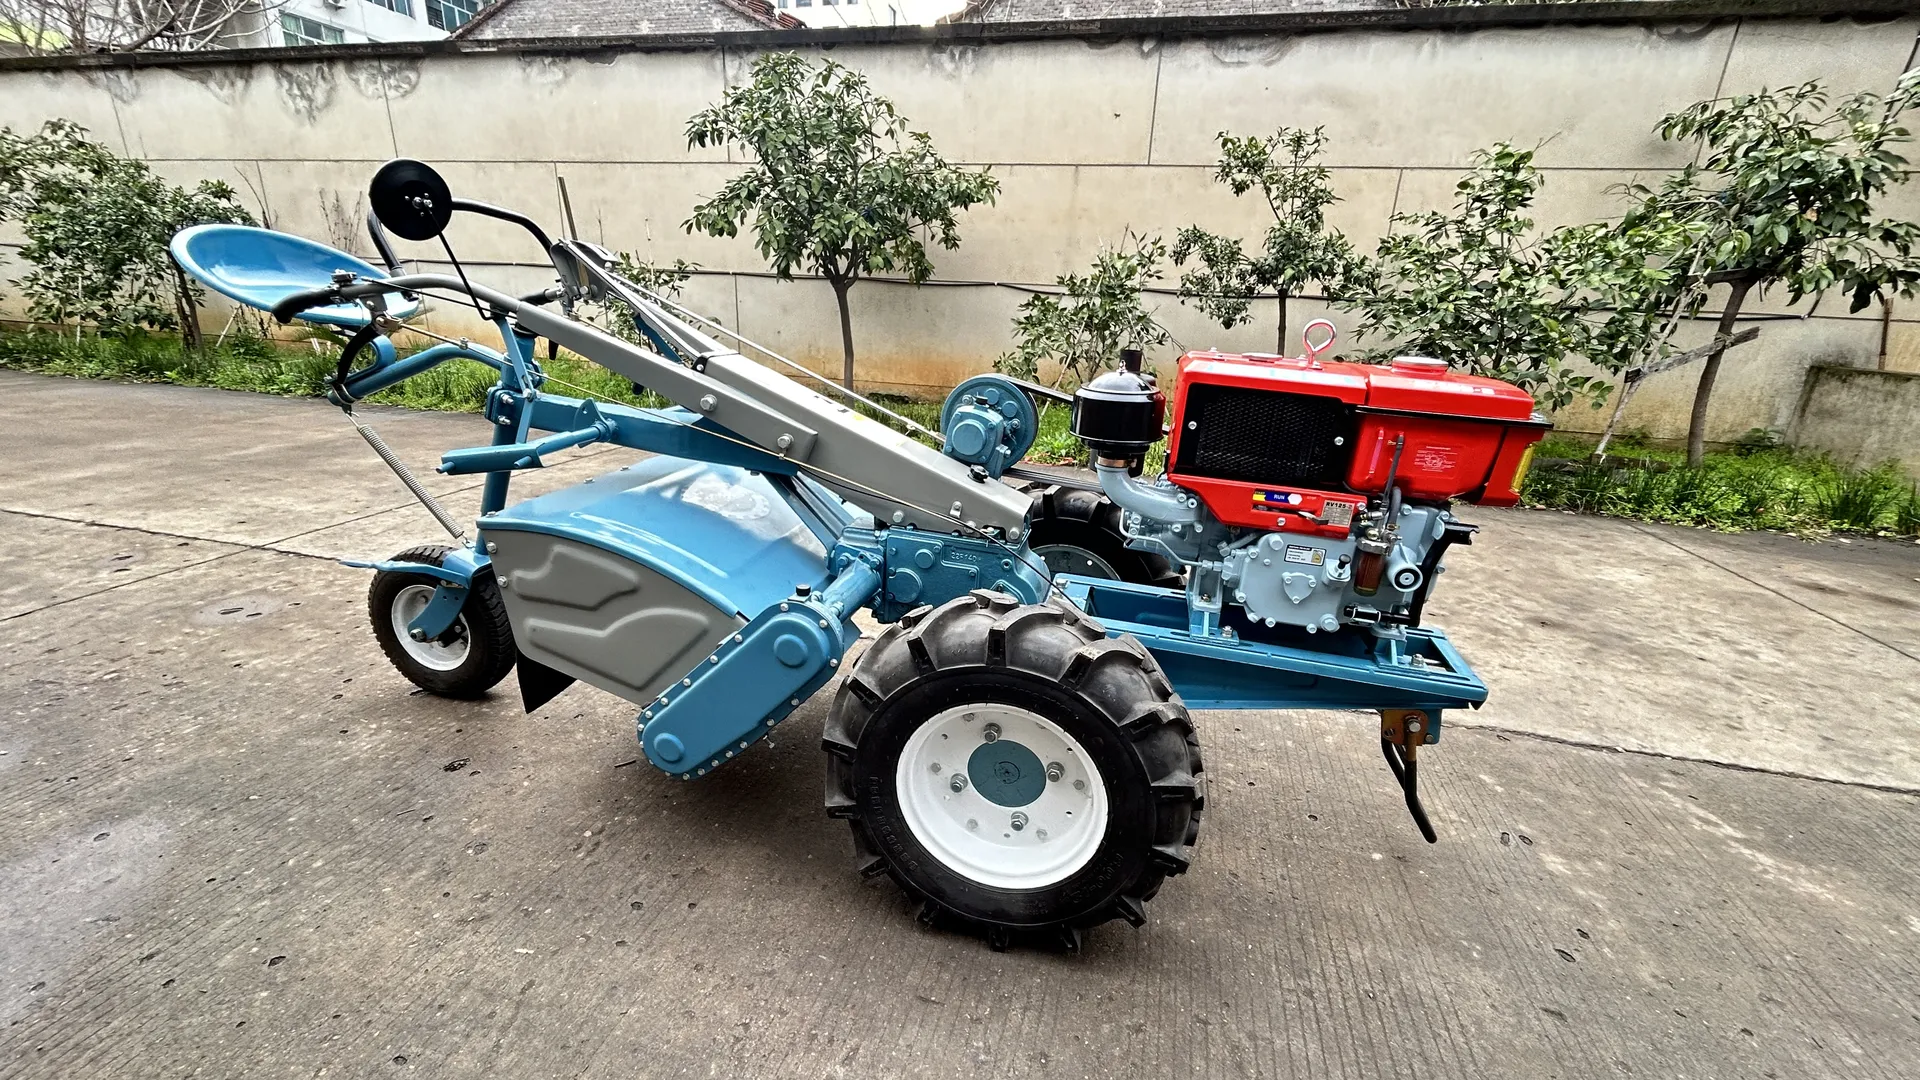
The same machine with the implement fitted. Until the implement, its drive and its brackets are named in the order, this is a configuration the factory can build rather than a specification you have bought.
What to ask the supplier — and in what words
Nine questions cover the four lines. Ask them as a block, in writing, and keep the reply with the order file.
- Which platform, and which configuration of it. Model, wheel setup, and the engine package with its starting method — a hand-crank and an electric-start engine are different supply items for the same chassis.
- Which implement, by its full description. Not "rotary tiller", but the working width and the blade arrangement: 480 mm or 600 mm, and how many blades.
- Is this implement built for this platform, or for a power class? Platform-specific and generic mounted implements carry different mounting and drive assumptions. Ask which one you are being quoted.
- What the mounting hardware includes. Bracket, pins, bolts and connecting hardware — and whether they ship with the machine or with the implement.
- Where the drive comes from. Which belts, chains, gearbox or drive components belong to the machine and which to the implement. This is the line that most often arrives incomplete.
- The wheel and tread setup. Tread settings decide how the machine works in the field, not how it looks: the GN12 documents five settings between 570 mm and 810 mm, the M80 a 390–780 mm range.
- What ships in which crate, and how the packing list will read. If the machine, the engine and the implement travel as separate items, that has to be visible in the document you clear customs with.
- Dimensioned drawings or photographs of the mounting and drive area. You are being asked to approve something you cannot see; a dimensioned view of the interface is the cheapest way to remove that risk.
- What is confirmed per quotation rather than from a specification sheet. Engine pairing, implement set, packing and commercial terms belong to the quotation, not to a reference table.
What an answer that is not an answer looks like: "it fits" without naming the platform, "standard size" without a width, "suitable for most power tillers" without the mounting pattern, or a photograph of another model's interface. Any of these means the check has not been done — by the supplier or by you.
What to measure before you order
Supplier answers cover lines 1, 2 and 4. Line 3 is yours, and it is measured with a tape on the ground, not read off a table.
What to measure | Why it decides the order | Recorded figures to compare against |
|---|---|---|
Narrowest point on the route — gate, bund gap, path between trees | The machine and the implement must pass it, and the implement is often the wider of the two | Overall width 710 mm (M80) · 980 mm (GN12) |
The machine's widest point | It is rarely the tyres: handlebar frames and guards set the real width | Wheel tread 390–780 mm (M80) · 570–810 mm (GN12) |
Strip you intend to work per pass, and row or bund spacing | Working width has to suit the crop layout, not just the engine | Tilling width 480 / 600 mm; blades 14 or 16 (M80), 18 or 24 (GN12, 600 mm sheet configuration) |
Headland and turning space at the row end | A walk-behind machine turns by lifting and swinging; it needs room a spec sheet does not show | Machine length 2050 mm (M80) · 2950 mm (GN12) |
Height in storage and on the transport | Guards and handlebars set the working height | Machine height 1235 mm (M80) · 1240 mm (GN12) |
Mass you handle, load and unload | Chassis weights exclude the engine; transport planning uses the complete package | 179 kg (M80) · 470 kg (GN12), without engine |
Two rules make those numbers usable. First, measure the widest thing, not the average: a 600 mm tiller on a 710 mm chassis still has to pass a 900 mm gap with the guards on. Second, check the crop layout, not only the width: the extension guidance cited above gives a worked example — a narrow tiller can still create a wider bed by overlapping passes, but a tool that needs a minimum distance between rows will not work if your rows are closer. If your customer plants on a fixed spacing, that spacing is a hard constraint, and it is worth settling before the order rather than after.
Where the field decides and not the machine — water, plot shape, soil — the more useful reading is matching the machine to field conditions. How to read the numbers you are given, and which are configuration-dependent rather than fixed, is covered in how to read a power tiller specification sheet.
What to document, and in what form
A confirmed order should leave a paper trail a second person can act on without calling the factory.
- A dated measurement sheet. The six measurements above, taken by a named person.
- A photo set of the interface. The mounting and bracket area, the drive side, the engine identification plate, the wheel and tread setup as ordered, and the implement's own identification — photographed with something of known size in frame.
- The quotation's configuration lines. Platform, engine package and starting method, implement with width and blade arrangement, wheel setup, packing.
- The packing list and crate numbers. Which item is in which crate, matched to the quotation lines.
- Loading photographs. What actually left, in what condition, before the container was sealed.
- A named sign-off. Who at the supplier confirmed the interface, and who on your side accepted it.
One safety rule belongs at the front of that list, because some of this checking happens with your hands on a machine: shut the machine down and cut the drive before touching, adjusting or clearing the mounting and drive area — extension guidance on agricultural machinery regulation is explicit that power is to be shut off before working on any machine, and that drive and nip points stay guarded. Photographs for the file are taken with the engine stopped too.

Three lines of an order, photographed separately: the chassis, the engine package and the implement set. Each is specified and shipped as its own item, which is why the packing list is part of the compatibility check rather than an afterthought.
The five errors that most often reach a container
These are the failures the checks above are designed to catch, stated as mistakes because that is how they are described after the fact.
- Ordering by implement name. "One rotary tiller, 600 mm" is not an order until the platform, engine package and wheel setup are attached to it. The same implement line means different hardware on different platforms.
- Assuming last season's implement fits this season's machine. Brackets and drive arrangements change with platforms; re-confirm the interface each time, even when the model name looks the same.
- Treating two widths as one machine. 480 mm and 600 mm arrangements differ in blade count and coverage — 14 against 16 blades on the M80, 18 against 24 on the GN12's 600 mm sheet configuration — and the narrower machine is not a substitute for the wider one in a quotation.
- Assuming the connecting hardware follows the implement. Brackets, pins and drive components sit on one side of the order or the other; an item landing without its mounting hardware is a machine that cannot work.
- Leaving the wheel and tread setup out. Tread settings decide how the machine sits in the row and behaves on wet ground. An order without a tread setting is one the factory has to guess at.
The purchasing-side counterpart — how to write the enquiry so the answers come back complete the first time — is set out in the power tiller procurement guide.
A pre-order confirmation sheet you can copy
Twelve lines. Each has an answer that either exists or does not; there is no column for "probably".
# | Confirm | Answer comes from | Signed off by |
|---|---|---|---|
1 | Platform and configuration | Quotation | Buyer + supplier |
2 | Engine package and starting method | Quotation | Buyer + supplier |
3 | Implement, with working width | Quotation | Buyer + supplier |
4 | Blade count and arrangement | Quotation / specification sheet | Supplier |
5 | Mounting bracket and connecting hardware scope | Supplier parts list | Supplier |
6 | Drive components: machine side and implement side | Supplier parts list | Supplier |
7 | Wheel and tread setup | Quotation | Buyer + supplier |
8 | Access, working width, row spacing and turning space on site | Buyer's measurement sheet | Buyer |
9 | Working mass and transport handling | Quotation / specification sheet | Buyer |
10 | Crate contents and packing list wording | Packing list | Supplier |
11 | Interface photographs and dimensioned views on file | Buyer's order file | Buyer |
12 | Commercial terms as stated per quotation | Quotation | Buyer + supplier |
If lines 1 to 7 cannot be filled in from documents you already hold, the order is not ready to place — not because the machine is wrong, but because nobody has yet said what is being bought. Once the sheet is complete the enquiry is short: the platform, the implement set with widths, the wheel setup, the field measurements, and the question of what will be confirmed per quotation. You can send those and get a configuration back.
FAQ
Which attachments are available for a power tiller? On the platforms described here the documented working implements are the rotary cultivator (480 mm / 600 mm arrangements), a single-furrow plough on the M80 and a double-furrow plough category on the GN12, anti-skid steel wheels for traction work, and a small trailer connection for short-distance transport. Implement sets vary by platform and are quoted separately from the machine rather than supplied as standard — which is why the interface check comes before the order.
Are implements interchangeable between power tiller brands? No. Each walking tractor and its implements form a system: the implement attaches to that machine's bracket arrangement and is driven from that machine's transmission. An implement built for a different walk-behind tractor will not connect, and neither will a full-size tractor's rototiller. The exception worth knowing is the generic mounted implement designed for a power class and driven from the engine pulley — it can suit more than one machine, but only where the take-off and bracket points match, so it still has to be confirmed rather than assumed.
Can I use a full-size tractor's rotary tiller on a walk-behind tractor? No. They belong to different classes with different attachment and drive arrangements. A three-point-hitch implement expects a linkage and a PTO shaft a walk-behind tractor does not have; that is a mismatch of system, not of size.
What should be confirmed before an order is placed? The platform and configuration, the engine package and starting method, the implement with its working width and blade arrangement, the mounting and connecting hardware, which drive components belong to the machine and which to the implement, the wheel and tread setup, the on-site measurements, and the crate contents. Anything the supplier can only confirm per quotation should be stated there rather than inferred from a specification sheet.
Bottom line
Compatibility on a walk-behind tractor is a procedure, not a fact you look up. Confirm the platform, the mounting and drive interface, the field dimensions and the order scope — in that order, in writing, before the order is placed. Keep the measurements, photographs and packing list together; they are what makes the second order easier than the first. What happens after delivery — parts, service and how a fault is reported — is a separate procedure, documented under how parts and service are handled after delivery.